Greenleaf’s Glencroft Dollhouse DIY Build
- Lisa Gordon
- Jan 22, 2023
- 3 min read
By Lisa Gordon January 22nd, 2023
I have no idea how I ever even thought about diving into the miniature world. I absolutely love crafting, letting my creative juices flow, and I especially love working with wood of each & every sort!
I guess that's how it started. PINTEREST 😁 Blame Pinterest. I do remember wanting a dollhouse when I was a little girl, but it was just so I could decorate it, rearrange, etc. It honestly had nothing to do with the dolls. I can't even recall if I ever had a dollhouse. Now I'm a grandma, but I don't have any granddaughters yet.
Okay, on to my point. Danny purchased my very first DIY kit from Greenleaf (I'll attach the link later). I found it on eBay, in which I had not used in ages! I originally wanted to build one (and still will one day; hopefully sooner than later), but upon researching on Pinterest, I realized it wasn't as realistic for me (at the moment anyhow), so I decided to get a kit. Of course, I chose one of the most challenging ones (from what I read) right out of the gate 😂.

Day 1, I started on it right away. The instructions are very good for being instructions. I'm not much for them usually, but of course, with a million pieces, and wanting to do the absolute best job, I skimmed them a little first, then went to town. There are like 16 or 18 numbered sheets, in which need numbered BEFORE punching them out. I'm going step by step & checking each step & part off as I go.


Skip ahead to day 5 (I think...). I have the majority of the house complete. I' going to do some more inside work before I get the roof completely put on. That way it's easier to get to everything. So far I have stained all the wooden ceiling beams (installed them as well-daunting!), painted the kitchen & li wing room ceilings, installed the floor in the kitchen & living room floors using veneer edging in Red Oak from Home Depot. GREAT idea I got from Pinterest, of course.
I did the kitchen floor in a herringbone pattern & stained it with Minwax in Weathered Grey. It's not perfect by any means, but I don't think it will be that noticeable once I get furniture & decorations in there :)


Oh yeah, I've painted the kitchen a Country Grey. I'll likely keep it that color. I got the kitchen & living room (95%) done with one roll. It was so easy. You can cut it with scissors, and iron it on. The herringbone pattern took me quite a bit longer than I figured. Needless to say, I didn't do that in the much larger living room lol
As of today, I got the bathroom floor done (not using the veneer edging. I'm going to post a few more photos, then lastly the bathroom floor that I am absolutely in love with!!! I'm not going to detail how I did it/what I used, in this blog, because I will post a blog/tutorial on that tomorrow :)


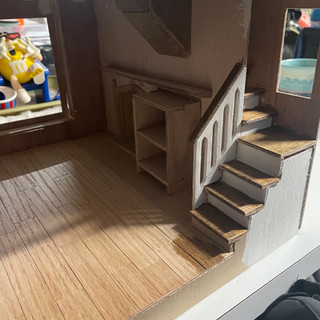
Originally I was going to stain the stairs to match the beams (did I mention how much I love wooden beams??), then I decided to just stain the steps.
On to my favorite part so far!! Let me know what y'all think & if you can guess what the bathroom theme is! I can't wait to share the tutorial tomorrow.


After taking these I got the couple of boards that were a little raised, to lay flat.
Lmk what you think!!


Comments