Sail Away for Christmas
- Lisa Gordon
- Dec 14, 2022
- 4 min read
December 14th, 2022 by Lisa Gordon
Easy DIY Sailboats

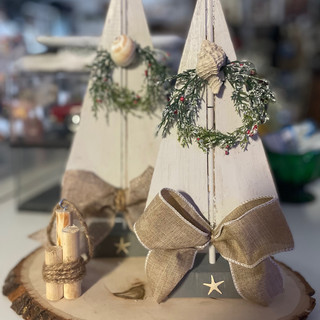
If you're anything like me, you saw a project on Pinterest that you just knew you had to make, and your wheels started spinning. I saw these tall wooden sailboats with a little Christmas wreath on them & grabbed some stuff to make them at the dollar store. Why not? I intend to use them in my own house, & the wood is just the right size & weight for the project.
We moved into a house on the lake last year in Northeastern MI & I decided to go with a coastal theme. I think I would call it coastal farmhouse somewhat. Either way, I just love the pop of light aqua's & blues with greys, whites, and natural colors. So, when I saw these sailboats, I had to give it a try. Below is a list of the supplies you'll need & a little instruction to get you started, but your taste & imagination will be your best guide. Another fun thing about these is I used Velcro on the holiday greens so that I could change it out after the holidays and display them year round.

If you're crafty, and you have the tools, chances are you'll make these yourself. They're really that easy. If you're not crafty (I bet you are and you just don't know it) or you just don't have the time or tools, and you want a set, shoot me an email & I can fix you up a set & send them to you for a small fee, plus S&H.
Supplies:
2- 11"x5 1/2" slabs of wood from Dollar Tree or any light scrap wood you may have
2-scrap pieces of 2x4 cut down to 5 1/2"x3 1/2"
Small wood dowels (I used 4 6" in long; 2 per boat)
Miter saw
Tape measure
Hot glue
Burlap ribbon for bows (whatever style you prefer really)
Holiday greens of your choice
2 seashells or any embellishment you like
2 small craft starfish (link below)
Minwax stain in Weathered Gray
Any light grey or white paint (I used a light grey paint left over from our house)
Wire brush or sanding sponge
4 small pieces of Velcro
Ruler or triangle
Twine or wire
Drill (same diameter as your wood dowel)
Vaseline
Scissors
Instructions:
Start by figuring out how tall you want your sail boats. I wanted one just slightly shorter than the other. Cut your pieces to size. My tallest boat is 10" in length. The skinniest part at the top is 3/16 of an inch & 2 3/4" being the fattest part. Do the same for the other side, regardless of the size you choose.
Then cut your scrap piece of 2x4 or whatever you use for a base. I Cut the 2nd boat to just under 9" with the top, skinniest part the same as the 1st boat. The fattest, bottom part I cut to 9" as well. It's easier to just use a ruler or triangle, laying it on the wood and marking it with a pencil. Just don't mark a full triangle. The sides won't fit right & younwont get the sailboat look. Only one side is angled.
Drill a hole the same size of your dowel into the center of your 2x4 base, or whatever you decided to use for a base. Be sure to not drill all the way through, but just enough that the dowel will hold up the sails.
Insert your 1st dowel into the hole. Then take your 2nd dowel and see if you need to cut it. On the tallest boat, I used two 6" dowels, not cutting either. Once is tuck the 1st dowel into the hole, I placed my left sail against it, then the right one, to see if they lined up. They did, so I glued both sides to it and laid it down to dry while I worked in the next one.
For my shorter boat, I cut the 2nd dowel down to 4". My sails didn't line up all the way at the top, but I thought it gave it character, and you can actually leave the dowel the 6" length & attach a small flag or something if you prefer. I glued the sails the same as the 1st.
Before painting or staining your wood & dowels, use a paint brush and brush a small dab of vaseline in random areas of the wood (I didn't do this on the base) Stain or paint your wood. The Vaseline will prevent paint from sticking in those random spots. I used the Weathered Grey stain for the base & the light grey for the mainsail & headsail. While the paint and/or stain dries, you can take advantage of this time & make your bows and decide what greens & embellishments you want to use. If you're not sure how to make a bow, this one's really simple. If you have small bows in your stash, you can use those. I happened to already have these done & in my stash from past Christmas'.
Cut your ribbon approximately 16-18" just to have plenty to work with. Hold the ribbon with your dominant hand and fold one side over to make a loop. Gather it and pinch with your index finger & thumb. While holding that in place, make a loop of the same size with the other end and join them together, pinching them together until you get the desired length. I used twine and tied it around the center. I didn't cut the tails until I placed it on the sails.
Once the paint was dry, I used the wire brush and just lightly ran it along the wood in random spots. Next, tie your bows around the bottom of the sail (around the dowel) and cut off the excess in the back. Cut the tails to the desired length. You can pin tail the bows or leave them. It's all a matter of preference.


Next, cut a small piece of Velcro, just to size where it won't show behind your embellishment and/or wreath.


Comments